
Drawing Board Guide: Draw on Your Screen, Step by Step
A step-by-step guide to the drawing board. You will start it, learn the toolbar, draw with every tool, work with pages and boards, save your work and pick
A step-by-step guide to the drawing board. You will start it, learn the toolbar, draw with every tool, work with pages and boards, save your work and pick it up again.
- Free: the whole board, including Copy and Done (pictures and a PDF).
- SlyPilot Pro: only the Edit button, which opens your drawing in the screenshot editor.
Everything here happens on your PC. Nothing is uploaded.
1. Start the Board
Choose the way that suits you:
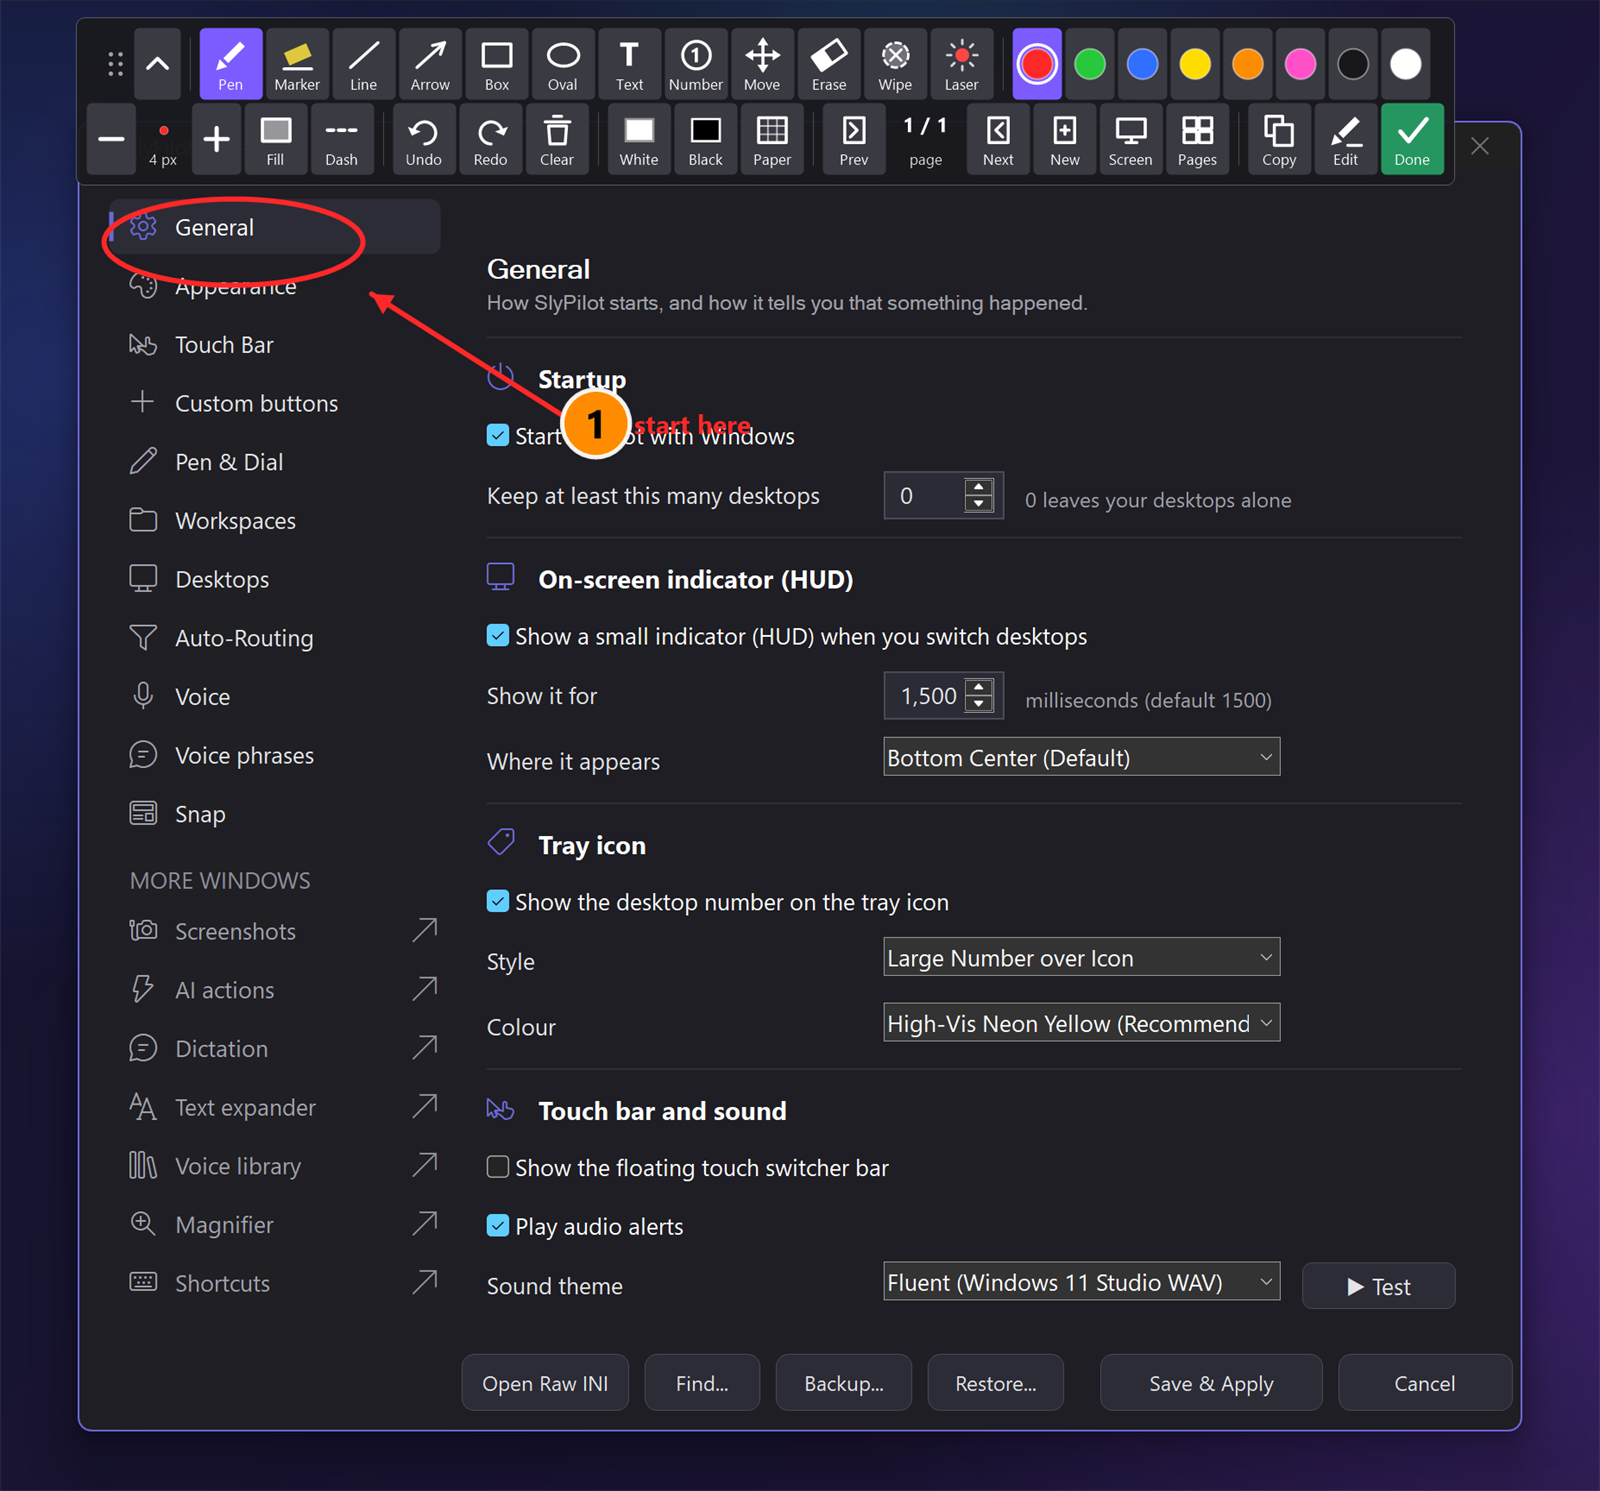
| Do this | To get |
|---|---|
| Say "draw on the screen" (or "start drawing") | The board over the monitor your pointer is on. Your screen stays live under it. |
Press Ctrl+Alt+Win+W | The same. |
Say "zoom and draw", or press Ctrl+Alt+Win+Z | A zoomed, still picture of the monitor. |
| Tray menu: Utilities > Magnifier | The same, from the menu. |
| The Draw button of the Magnifier window, or the big-button panel (say "magnifier panel") | The same, with big buttons. |
SlyPilot.exe mag draw / mag draw zoom | The same, from the command line or a Stream Deck. |
A toolbar appears at the top, in the middle of the monitor. Voice commands for the board work only while it is up (step 12).
Zoomed boards. Move the pointer to pan the picture, turn the mouse wheel to zoom, and start drawing. Your first stroke locks the view.
2. Learn the Toolbar
The bar is made for fingers: big buttons with a small picture and a word.
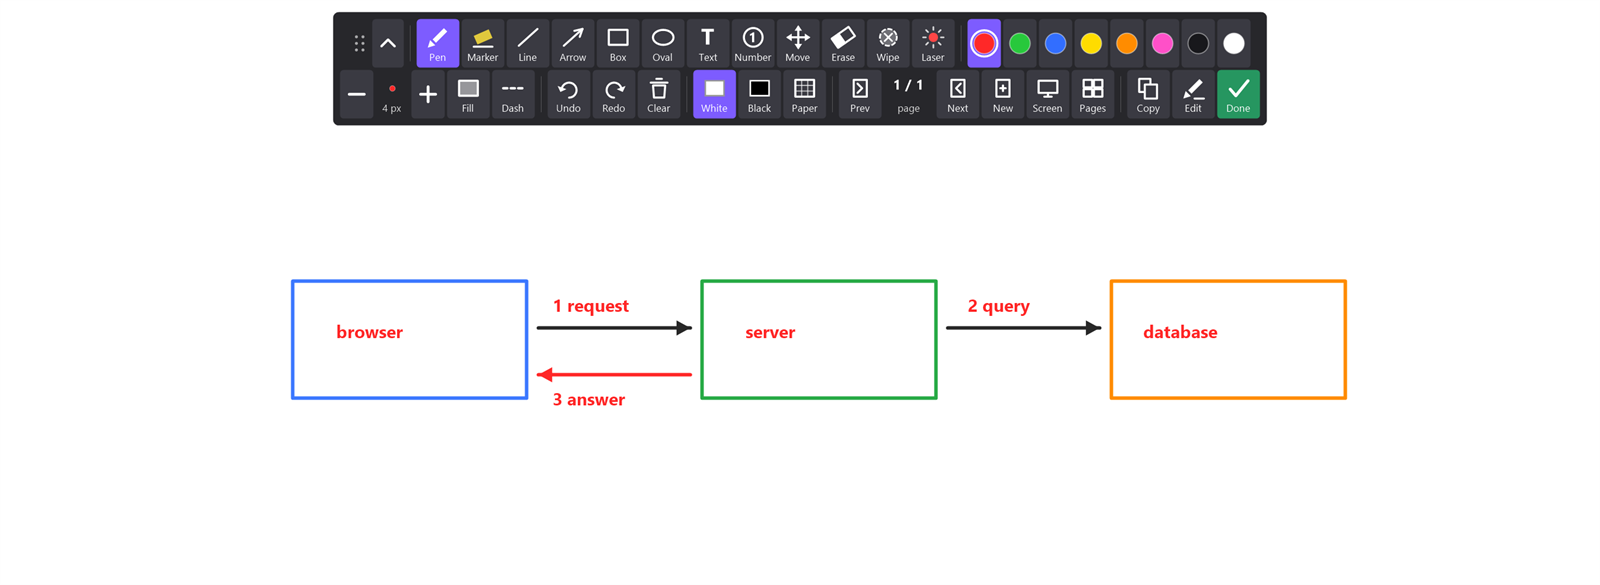
- Drag the handle. The grip of six dots at the left moves the whole bar, so you can put it at the bottom, or beside your hand. It stays there while SlyPilot runs.
- Fold it. The button beside the grip shrinks the bar to the handle and one button. Press it again to open the bar.
Hhides and shows the bar. - Read the groups, left to right: Tools, Colours, Width with Fill and Dash, Undo, Redo, Clear, White, Black, Paper, Pages, and finally Copy, Edit and Done.
On a narrow monitor, the bar wraps into two rows between groups. The tool in use is shown in your Windows accent colour.
3. Draw with the Tools
Try each tool once on a practice area.
- Pen. Drag. With a Surface Pen, press harder for a wider line.
- Marker. A see-through highlighter. Drag over a word.
- Line, Arrow, Box, Oval. Press at one corner, drag to the other, let go.
- Text. Click where the text goes, type, press
Enter.Shift+Enterstarts a new line.Ctrl+Vpastes text.Esccancels. - Number. Click: a numbered circle appears (1, then 2, then 3). Use it for steps. Undo one, and the next click gives the number again.
- Laser. Move over the screen: a glowing trail fades. It leaves nothing behind.
Shortcuts with the pen: hold Shift for a straight line, Ctrl for a box, Ctrl+Shift for an arrow, and press Tab to switch to the oval tool and back.
4. Colours, Width and Styles
- Click one of the eight swatches: red, green, blue, yellow, orange, pink, black or white. Keys:
R,G,B,Y,O,P. - Change the width with the minus and plus buttons,
+and-, or the mouse wheel (1 to 30). The dot shows the colour and size, and the number. - Press Fill (
F) so that boxes and ovals are filled with a see-through colour. - Press Dash (
D) for dashed lines.
The colour, the width and the tool are remembered next time. A ring round the pointer shows what a stroke will look like.
5. Undo, Redo and Clear
- Undo:
Ctrl+Z, the button, or say "undo the stroke". It takes back strokes, erases and moves, in the order you did them. - Redo:
Ctrl+Y, the button, or "redo the stroke". - Clear:
E, the button, or "clear the board". Only the current page is cleared.
With a Surface Pen, the pen button helps while the board is up: one click undoes, two clicks redo, a hold turns the laser on and off.
6. Erase and Wipe
- Erase (
X) takes away a whole stroke when you touch its line. - Wipe (
Q) is a pixel eraser: rub over a stroke and only that part goes. Whatever is under it (the screen, the paper) shows again. - With a Surface Pen, turn it over: the eraser end erases whatever tool is chosen. The pen's barrel button held with the tip on the glass erases too.
- Undo brings back what you erased.
7. Select, Move and Resize
- Choose Move (
V). - One stroke: drag it somewhere else. Turn the mouse wheel (or press
+/-) with the pointer on it to make it bigger or smaller. - Several strokes: drag a frame over an empty place. What the frame touches is selected in a dashed box. Drag inside the box to move them together, use the wheel to resize them together, press
Deleteto remove them.Esclets go. - All strokes:
Ctrl+A, or say "select every stroke".
Each move, resize or delete is one step of Undo.
8. Tidy a Stroke by Holding Still
- Choose the pen.
- Draw a rough circle and keep the pen on the glass for about a second at the end.
- It becomes an oval. A rough square becomes a box, and a nearly straight stroke becomes a straight line.
- Lift the pen to keep it. A zig-zag or a tiny scribble stays as it is. The marker only straightens.
To switch this off, untick Hold the pen still to tidy a stroke in the Magnifier window.
9. White Boards, Black Boards and Paper
- Press White (
W) or Black (K) to cover the screen with a plain board. Press the same button again to see the screen again. - Press Paper to cycle plain, squared and lined paper. Or say "grid paper", "lined paper", "plain paper".
- Pick an ink that you can see: the white ink for a black board.
The paper is part of the saved pages and the PDF, and a new page keeps it.
10. Pages
- Press New (
Ctrl+N) for a blank page. It is white, or black on a black board. - Press Screen for a page that is a still picture of the screen right now. Use it to mark up slides: change slide, press Screen, draw.
- Move between pages with Prev and Next (
PgUp,PgDn). Each page has its own strokes and its own Undo and Redo. - Press Pages (
F2, or say "show the pages") for an overview:- click a picture to open that page,
- drag a picture to a new place to reorder,
- click the X twice to delete a page (the last page left is cleared instead of deleted),
- press + New page to add one.
Escor a right-click closes the overview.
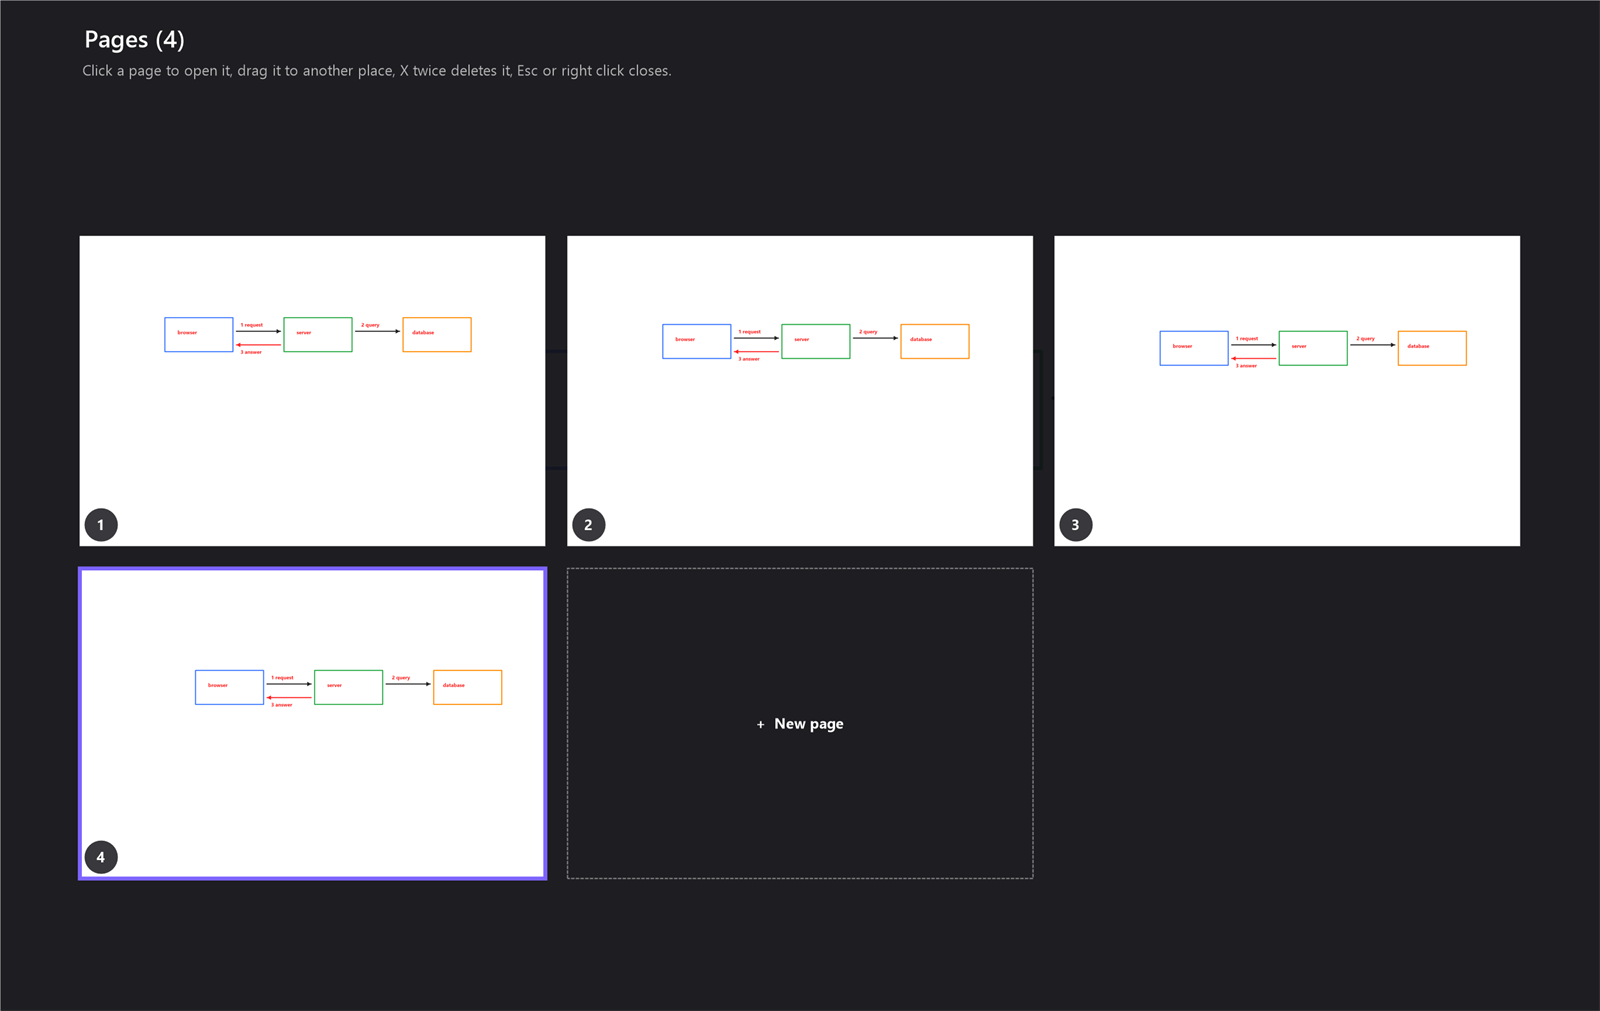
There can be up to 30 pages. A page you leave is frozen as it was, so a live page does not change when the screen does.
11. Paste a Picture and Text
- Copy a picture anywhere (a screenshot, an image from a browser).
- On the board, press
Ctrl+V, or say "paste the picture". - The picture appears in the middle (at most 60 percent of the screen) with the Move tool on. Drag it, and resize it with the wheel.
- If the clipboard holds text and no picture,
Ctrl+Vputs the text on the board instead. While you type with the Text tool,Ctrl+Vpastes text too.
The picture goes with Undo, the eraser, the saved pages and the PDF.
12. Draw by Voice
These words work only while the board is on the screen.
| Say | What happens |
|---|---|
| "pen tool", "marker tool", "line tool", "arrow tool", "box tool", "oval tool", "text tool", "number tool", "move tool", "eraser tool", "wipe tool" | Choose a tool |
| "red ink", "green ink", "blue ink", "yellow ink", "orange ink", "pink ink", "black ink", "white ink" | Choose a colour |
| "thicker pen", "thinner pen" | Width |
| "whiteboard", "blackboard", "grid paper", "lined paper", "plain paper" | Board and paper |
| "next page", "previous page", "new page", "page from the screen", "show the pages", "save the pages" | Pages |
| "undo the stroke", "redo the stroke", "clear the board" | History |
| "paste the picture", "select every stroke", "delete the selection", "make the stroke bigger", "make the stroke smaller" | Pictures and strokes |
| "copy the drawing" | Copy |
| "stop drawing" | End the board |
Say "draw on the screen" or "zoom and draw" to start, and "resume the drawing" to bring the last drawing back. The full list is in the voice command reference.
13. Save Your Work
- One picture: press Copy (
Ctrl+C) or say "copy the drawing". The picture of the current page (your strokes over the screen or the board, without the toolbar) goes where your screenshot settings say: clipboard, a file inPictures\Screenshots, the history and a small preview. - To edit it further: press Edit (SlyPilot Pro). Without Pro the Pro window opens instead.
- Several pages: press Done (or
Esc, or say "stop drawing"). With more than one page, SlyPilot saves them all first. In your screenshots folder you will find a folderDrawing <date and time>withpage 1.png,page 2.png... and one PDF next to it. The pages also appear in the screenshot history, and a message says where they are. - On request: press Save all or say "save the pages" at any time.
- A board with one page saves nothing unasked: Copy first if you want the picture.
To turn the automatic save off, set [Mag] DrawSavePages=0 in the settings file.
14. Resume Later
- End the board (Done or
Esc). - Later the same day, say "resume the drawing".
- Your pages come back, including pasted pictures and, for pages made from the screen, that screen.
Limits: it is kept for 24 hours, only for a monitor of the same size, and the Undo history is not kept. To keep nothing, untick Keep the last drawing so that I can resume it in the Magnifier window, which also deletes what was kept.
15. Pen and Touch Tips
- The board was made for a Surface Pen: pressure changes the width of the pen stroke, the eraser end erases and the pen buttons undo, redo and run the laser.
- A finger draws like a mouse. The toolbar buttons are sized for fingers.
- The Windows press-and-hold circle and flicks are switched off on the board, so a stroke starts at once.
- If the pen buttons start something else (the Touch Bar, the Snap card), check Pen Buttons > While the drawing board is up... in the settings.
- Right-click (or
Esc) ends the board; while you type text, it finishes the text first.
Pen pressure and the eraser end were read from the Windows documentation and are not covered by an automatic test, because there was no pen on the test PC. If something is off with your pen, please tell us.
16. Keys at a Glance
| Key | What it does |
|---|---|
Ctrl+Alt+Win+W / Ctrl+Alt+Win+Z | Start live / zoomed |
Esc | Let go of a selection; otherwise end |
Ctrl+Z / Ctrl+Y | Undo / Redo |
T M V X Q L N | Text, Marker, Move, Erase, Wipe, Laser, Number |
F / D | Fill / Dash |
R G B Y O P | Colours |
W / K | White / black board |
E | Clear the page |
PgUp PgDn Ctrl+N F2 | Previous, next, new page, overview |
+ - or the wheel | Width, or resize with Move |
Ctrl+C / Ctrl+V | Copy the picture / paste |
Ctrl+A / Delete | Select all / delete |
H | Hide or show the toolbar |
17. Troubleshooting
| Problem | What to try |
|---|---|
| The board does not open | Try the tray menu: Utilities > Magnifier. If you started the other mode a moment ago, the new one replaces it. Check logs\crash.log or run the Doctor (troubleshooting). |
| I cannot click the program underneath | The board takes every click while it is up. Press Esc or Done. |
| The voice words do nothing | They only work while the board is up, and voice commands must be on. |
| "next page" turns the page of another program | That is intended when the board is not up. Start the board first. |
| A pen button opens the Touch Bar or the Snap card | Pen Buttons > While the drawing board is up... decides this. |
| The pen draws one width | Pressure is read from a pen that reports it (a Surface Pen). A mouse or a finger always draws one width. |
| The strokes snap into shapes when I do not want it | Untick Hold the pen still to tidy a stroke in the Magnifier window. |
| My zoomed board moved | The pointer pans the zoomed picture until the first stroke. Draw once to lock it. |
| The pages were not saved when I pressed Done | A board with one page saves nothing. Check that [Mag] DrawSavePages is not 0. |
| "Resume the drawing" says there is nothing | The drawing is kept for 24 hours and for the same monitor size only, and not at all if the Keep the last drawing box is unticked. |
| Edit opens the Pro window | Edit needs SlyPilot Pro. Copy and Done are free. |
| A video under my drawing keeps playing | On a live page the screen keeps moving. Use Screen for a page that holds still. |
| The board is on the wrong monitor | It opens on the monitor the pointer is on. Move the pointer first. |
Next: The drawing board · Presenting guide · Screenshots guide · Teachers and trainers · SlyPilot Pro · all docs